
Build a functional, comfortable studio that helps you make better music without chasing perfection. Start by picking a listening wall and placing your desk, chair, and speakers symmetrically. Don’t sit in the room center; small moves like this improve sound and speed decisions.
Focus on first reflections — treat the walls, ceiling, and desk edges before adding random foam. Add bass traps in corners early, since low frequencies load there and shape what you hear.
Choose quiet AC and isolate noisy racks to keep takes clean. Prioritize one great LDC, a stereo SDC pair, a quiet interface, and a portable 500 series rack if needed. Use dynamic mics in poor rooms and place cardioids to use nulls effectively.
Remember that post work can fix issues: EQ room modes, use noise gates or iZotope RX, and rely on quality digital reverbs when the room is limited. Start simple, measure, and upgrade over time.
Key Takeaways
- Pick a listening wall and set the mix triangle first.
- Place speakers symmetrically and avoid the room center.
- Treat first reflections before adding more panels.
- Start bass control in corners with traps.
- Prioritize quiet gear and a small, high-quality mic set.
- Use EQ and cleanup tools in post to rescue tracks.
- Iterate over time; workflow beats perfection on day one.
Start with the room: dimensions, surroundings, and accessibility
Begin with a room that gives you predictable sound and easy access. A smart pick now saves time and budget later.
Avoid square and cube-shaped rooms
Rectangular rooms usually behave better than square or cube spaces. Cubes boost modal peaks and create frequency cancellations that mislead what your speakers reveal.
Assess external noise and airflow
Walk the space at different times to hear neighbors, traffic, and HVAC hum. Choose a spot where you can silence or control the air system during takes.
Plan power, cable runs, and access
Map outlets and plan dedicated circuits to reduce ground loops and unsafe daisy chains. Route cable runs intentionally—balanced lines tolerate length, but neat routing prevents RF issues and trip hazards.
- Favor symmetry so your speakers sit evenly to nearby walls.
- Evaluate windows and doors as leakage and reflection points; heavy drapes help but don’t replace treatment.
- Pick a room with enough area to add panels, a small booth, or extra gear as you grow.
Practical control up front—access, power, and low noise—keeps your setup efficient and prevents costly acoustic rework later.
Orient your space for accurate listening
A good listening setup starts with where you sit and how your monitors relate to nearby boundaries. Small moves often yield big audio gains, especially in small studio rooms.
Don’t sit in the center; use symmetrical speaker placement
Avoid the exact room center. Move your chair forward or back a foot or two to reduce modal nulls. Face the shorter wall when you can so speakers fire down the long dimension for smoother bass.
Keep left/right boundaries symmetrical around your listening spot. Establish an equilateral triangle: tweeters at ear height, equal distance between each speaker and your head. Angle the speakers slightly inward (toe-in) so their sweet spot converges just behind your head.
Find and treat first reflection points on walls, ceiling, and desk
Use the mirror trick to mark first reflection points on side walls, the ceiling, and the desk surface. Those positions are prime targets for broadband panels and quick control of early reflections.
Decouple monitors from the desk or use stands to cut mechanical coupling and desk comb filtering. Start with minimal early reflection treatment, then measure and listen before adding more panels.
“Place the listener off-center and keep speaker boundaries symmetrical to stabilize the stereo image.”
| Action | Why it helps | Quick check |
|---|---|---|
| Seat off-center | Reduces modal cancellations | Play bass sweep, move chair |
| Symmetrical speaker placement | Stabilizes phantom center | Measure equal distances |
| Treat first reflections | Clears midrange and imaging | Mirror trick and add panels |
| Decouple monitors | Reduces comb filtering | Use stands or isolation pads |

Design tips for home studios: a practical step-by-step setup
Start by picking the wall that gives the steadiest bass response and build your listening position from there.
Define the mix triangle first. Place tweeters at ear height and form an equilateral triangle between left speaker, right speaker, and your head. This sets a reliable reference point before any acoustic panels go up.
Place furniture and monitors before treatment
Arrange the desk and chair so the left/right boundaries are symmetrical. Put monitors on stands or solid decouplers to cut desk coupling.
Hang panels only after you verify speaker position. That prevents over‑treating one area and losing natural imaging.
Measure, listen, and iterate
Run quick sine sweeps or use a measurement mic with free software to spot first reflections and bass issues.
Make one change at a time—angle, height, or distance—and re-measure. Use reference tracks you know to check translation as you adjust.
“Small, informed moves over time beat a single big change that breaks your mix.”
- Note each revision with photos so you can revert if needed.
- Start broadband panels at first reflections, then add corner traps incrementally.
- Reserve budget for stands and portable gobos to test ideas without permanent work.
| Step | Action | Why it matters |
|---|---|---|
| 1 | Select listening wall and set triangle | Stabilizes bass and stereo image |
| 2 | Place desk, chair, and decoupled monitors | Reduces comb filtering and mechanical coupling |
| 3 | Measure, change one variable, re-test | Shows cause-and-effect for each tweak |
| 4 | Treat reflections, then add bass traps | Controls mid clarity first, then low-end energy |
Acoustic treatment that actually improves sound
Effective acoustic treatment starts with materials that tame mids, not just hissy highs. Use solutions that change what you hear, not just what looks neat.
Start with broadband absorption. Build or buy 4–6″ panels filled with mineral wool or rigid fiberglass and leave a small air gap. That combo soaks midrange and highs and gives more honest mixes than thin foam.
Thin foam mainly touches very high frequencies and can leave the low mids muddy. Chris and other pros prefer DIY mineral wool panels for great results on a tight budget. Brands like GIK speed the process if you want premade quality.
Treat first reflection points on side walls and the ceiling to sharpen imaging. Add absorption on the back wall behind the listener to cut slapback. Space panels off the walls a few inches to boost low‑mid performance.
Combine fixed panels with portable gobos or packing blankets on stands to make flexible recording zones. Check changes with simple claps and spoken voice before and after.
“First reflections are early wins—treat them first, then tune the rest of the room.”

Manage low frequencies and bass build-up
Low frequencies pack energy into corners — treat them first to gain control. This is the quickest way to reduce boom and tighten mixes in a small studio.
Load up the corners:
Load up the corners: bass traps, tube traps, and deep absorbers
Prioritize vertical corner treatment where pressure collects. Stack floor-to-ceiling traps or use tube-style absorbers to smooth decay.
Deep, porous absorbers work best around 60–250 Hz. That range often rings in compact rooms and hits vocal and instrument ranges.
Understand standing waves and why small rooms shift problem frequencies
Standing waves form between walls and cancel near the center. As room dimensions shrink, problematic modes rise in frequency.
Measure modal peaks with simple sweeps or a measurement mic. Then add traps in vertical corners, and consider wall-ceiling junctions next.
“Even modest corner treatment improves translation more than buying another plugin.”
- Start at the front corners near monitors, keep left/right symmetry.
- Reassess after each addition to avoid overdamping low mids.
- If budget is tight, stage traps and measure RT60 as you go.
| Problem | Solution | Quick Check |
|---|---|---|
| Corner pressure | Stack bass traps floor-to-ceiling | Bass sweep before/after |
| Modal peaks 60–250 Hz | Deep porous absorbers or tube traps | Measure peaks with test tones |
| Asymmetry | Match front-left and front-right traps | Listen for stable phantom center |
Make it quiet: noise control and isolation choices
Cut background rumble early by treating ventilation, windows, and noisy gear before you hit record.
Quiet matters more than you think. Choose an AC unit rated for low dB or plan to switch the HVAC off during soft passages. Storyk and other pros advise scheduling takes when systems can be paused.
House servers, drives, and amps in isolation racks with soft mounts to stop mechanical noise from bleeding into mics. Never seal gear in a tight closet without ventilation; that turns a quiet box into a resonant, overheating problem.

“Check windows and air paths in advance—prevention saves time in post.”
- Treat door gaps and windows with seals and heavy curtains to cut outside noise.
- Place noisy equipment behind you and use cardioid nulls to reject unwanted sound.
- Use rugs or floating floor solutions to reduce footfall and structure-borne vibration.
- Power condition and ground circuits to avoid hum from lights or shared outlets.
- Run a quick “quiet mode” checklist before takes: HVAC off, fans low, notifications muted, drives parked.
Talk to the people who share your space and set quiet hours. Simple coordination often keeps projects on schedule and saves hours of cleanup later.
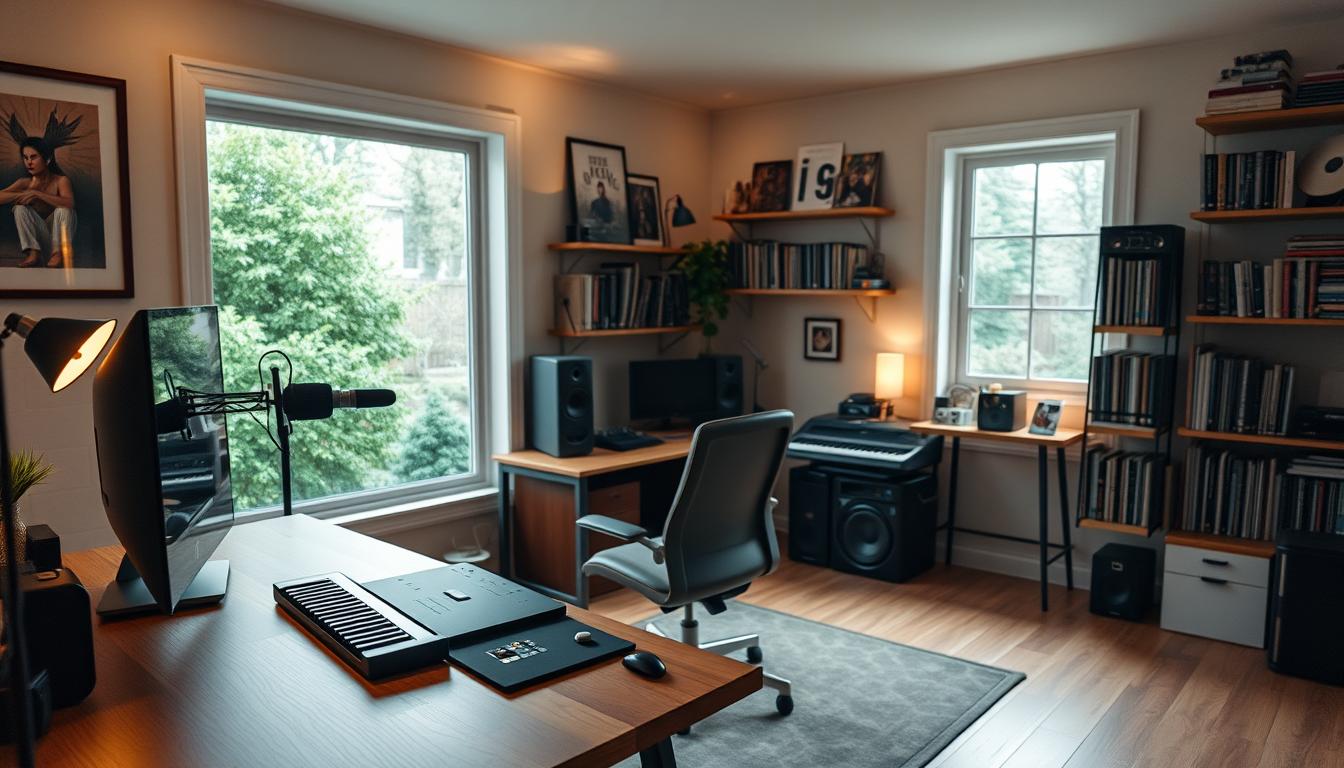
Monitors, speakers, and listening position
A stable stereo image starts with speaker placement and careful decoupling from hard surfaces. Get the basics right and the rest of the studio setup falls into place.
Angle, height, and decoupling for a stable stereo image
Set tweeters at ear height and form an equilateral triangle between your head and the two speakers. This gives predictable imaging and a more even frequency response.
Toe-in speakers so their axes cross just behind your head. Fine-tune angle using a mono vocal track until the phantom center locks tight.
Decouple monitors from the desk with isolation pads or stands. That reduces vibration and desk-induced comb filtering and improves transient clarity.
- Keep equal distance to side walls to stabilize stereo width and balance.
- Use minimal, targeted panels at first reflection points near the speakers to clear midrange without deadening the room.
- Calibrate monitor level to a reference SPL so mix decisions translate and ears tire less.
Check polarity and time alignment after each move. Run quick polarity tests and swap cables if imaging collapses.
“Symmetry and decoupling give you the biggest gains in listening quality with the least hassle.”
Microphones and signal chain: buy right, not twice
Invest in capture quality up front; a clean source saves hours in post.
Choose a small, trusted mic set that matches your room and projects. Start with one large-diaphragm condenser (LDC) as a workhorse and add a stereo small-diaphragm condenser (SDC) pair for acoustic sources. Grotto and Storyk both recommend quality over quantity—Lawson, Heiserman, or Peluso are solid LDC choices.
Dynamic vs condenser: picking by room and source
Use dynamics when the room is noisy or untreated. They tolerate louder sources and reject ambience.
Reserve condensers for controlled takes and quieter performance spaces. Lysoivanov reminds engineers that condenser sensitivity demands care with placement.
Build a lean toolkit
Balance your kit: one LDC, a Miktek C5 or Rode TF-5 SDC pair, a quiet interface, and one or two clean preamps. Keep cables short and balanced to protect transients and lower noise.
500 series and outboard choices
Consider a 500 series rack for portable, modular mic pres, EQs, and compressors. The AudioScape 76D offers fast FET control that suits vocals, bass, and drums.

| Item | Role | Why it matters | Quick pick |
|---|---|---|---|
| LDC | Vocal workhorse | Gives consistent tonal capture and headroom | Lawson / Peluso |
| SDC pair | Acoustics/overheads | Accurate stereo image with low phase issues | Miktek C5 / Rode TF-5 |
| Interface & pres | Capture chain core | Quiet drivers and clean gain define noise floor | Reliable, low-noise unit |
| 500 series | Modular outboard | Future-proof expansion and portable value | Small rack with pres and compressor |
“Buy once, buy right: quality gear reduces cleanup time and improves translation.”
Placement and polar patterns for better recordings
Microphone aim and pattern selection are powerful ways to improve captures without heavy treatment. You can control a lot of room reflection by where you point the mic and how close you place it.
Use cardioid rejection: point the mic’s null at the worst boundary
Aim a cardioid’s rear null toward the most reflective surface (a bare wall or window) to reduce early reflections. Lysoivanov recommends this as a fast, practical way to lower unwanted room sound.
In noisy or untreated rooms, reposition the performer so the mic’s null works for you rather than rebuilding the room.
Close miking strategies to minimize room tone when needed
Use closer placement with dynamic mics to keep room energy down. Dynamics tolerate loud sources and reject ambience better than many condensers.
- Place vocal mics slightly off-axis to curb sibilance and plosives while keeping natural tone.
- Elevate or angle mics to avoid desk and floor reflections that cloud the midrange.
- Use portable gobos behind the mic to tame early reflections without permanent treatment.
“Check polarity with multi-mic setups and document placements so you can repeat what worked.”
Recording vocals at home without the closet myth
Recording vocals in a small room needs simple rules, not myths about closets saving the day. Closets and bathrooms have close, parallel walls that boost high-frequency standing waves. That makes vocals sound boxy and uneven.
Pick the largest available room. Bigger space pushes modal problems lower and reduces comb filtering around the voice. Use blankets or a gobo behind the singer to catch early reflections while leaving some openness for natural air.
Practical mic technique and basic rules
Follow the fist rule: keep about a fist’s distance from mic to avoid proximity boom. Use a pop filter to tame plosives.
- Angle the singer slightly off-axis to the capsule to cut harsh sibilance without heavy processing.
- In noisy or reflective rooms, use a dynamic mic; save condensers for better-treated spaces.
- Track conservatively to preserve headroom and avoid clipping on peaks.
“Record dry and add reverb later—good digital rooms beat a bad real one.”
Teach consistent mic technique and label takes clearly. People who keep steady distance and organized files make comping and tuning faster, and that preserves creative momentum in a small studio.

Workflow-first studio design for productivity
Arrange your workspace into task zones so creativity and mixing don’t fight each other.
Define clear areas for writing, tracking, and mixing. That lets you shift tasks without dragging cables or moving monitors. Chris stresses comfort and long-term workflow; make the room a place you want to return to each day.
Layout zones and practical setup
Keep instruments and mics on stands and ready. Quick access captures ideas before they fade and improves overall quality.
- Route cables cleanly between zones and label snakes to reduce hum and speed changeovers.
- Place a compact booth or a gobo corner only if it adds real isolation; don’t sacrifice usable space for a cramped enclosure.
- Keep monitors, controllers, and essentials within arm’s reach to retain control during sessions.
Grotto recommends a portable rig—laptop, small interface, and a compact 500 rack—to move fast between rooms or take work on the road. Storyk reminds us to balance function with a studio’s signature vibe so people feel creative, not boxed in.
“Small, deliberate zones beat a messy all-in-one room when you value time and focus.”
| Zone | Main function | Must-haves | Quick check |
|---|---|---|---|
| Writing | Sketching ideas | Keyboard, laptop, notes | Can you start within 2 minutes? |
| Tracking | Record takes | Mics, stands, gobo | Are mics prepped and labeled? |
| Mixing | Critical listening | Monitors, controllers, templates | Reference tracks load instantly? |
| Portable rig | Remote work | Laptop, interface, small rack | Fits a backpack and powers up fast? |
Vibe and aesthetics: inspire better performances
Small, intentional aesthetic choices speed setup and keep people focused on music. Chris stresses that comfort and coziness matter as much as treatment and monitors. Storyk adds every studio should have a signature while staying neutral at the listening position.
Make the space warm but honest. Use dimmable, indirect light and soft textures to relax performers. Keep the critical listening spot uncluttered so mixes stay reliable.
Showcase instruments and artwork that reflect your taste. That invites collaboration and sparks ideas. A great chair and a few tasteful panels pay off in comfort and long-term value.
Keep it clean and simple. Clutter drains creativity and costs time. Add plants or natural materials to boost air quality and perceived comfort without changing acoustics much.
- Balance warmth with neutrality at the mix position.
- Curate reference playlists so people know your sonic direction.
- Invest in a few high-value touches that lift look and function.
“The right vibe reduces friction, saves a lot of time, and keeps musicians excited to create.”

Post-production safety net: fix what the room leaves behind
When the room fights you, post lets you fix the most stubborn problems without tearing walls down. Use corrective moves that preserve takes and speed mixing on other projects.
EQ to identify and tame room modes and harshness
Sweep with a narrow cut to find standing waves (Lysoivanov points to common spots like ~230 Hz). Remove narrow peaks, then apply broader, musical shaping to restore balance.
Noise gates and spectral tools for cleanup
Use noise gates to trim room noise between phrases. Set attack and release so performances stay natural.
Reach for spectral repair (iZotope RX) to remove coughs, chair squeaks, or intermittent buzz without killing tone.
Choose good digital reverbs over a bad room
Track dry and add quality digital reverbs to craft believable space that often beats a poor real room. Keep wet/dry conservative and print alternate clean versions when possible.
“Post is a safety net: fix what you must, but address resonances at their source when you can.”
- Sweep with narrow EQ cuts, then use broader moves for musical balance.
- Use multiband compression to tame boomy low mids from room buildup.
- Confirm edits and denoise passes in mix context — solo rarely tells the full story.
- Keep a consistent processing chain so fixes remain repeatable across sessions.
| Problem | Post Solution | Quick Check |
|---|---|---|
| Standing wave / boom | Narrow EQ cut, then broad shelf for balance | Bass sweep and reference track |
| Background noise | Noise gate + denoise or RX spectral repair | Listen between phrases at mix level |
| Unusable room reverb | Print dry, add premium digital reverb | Compare with real-room references |
| Low-mid instability | Multiband compression and surgical cuts | Mono/stereo checks and A/B tests |
Budget, DIY vs commercial panels, and smart upgrades over time
Spend where the return is measurable: treatment and monitors typically give bigger wins than extra plugins or flashy gear.
Plan upgrades in phases so each purchase improves what you hear in the chair.
DIY mineral wool panels deliver real value
Build 4–6″ frames filled with mineral wool and wrap them in breathable fabric. These panels soak mids and highs that thin foam misses.
DIY saves budget and often matches the performance of pricier options. Reinvest the savings into a quiet mic or better monitors.
When to buy premade acoustic panels
Buy premade acoustic panels when you need speed, matched finishes, or certified fire ratings. Brands like GIK make it easy to get consistent quality fast.
Premade options are worth it if you lack time, carpentry skills, or need vendor support for mission-critical equipment.
- Start with early-reflection panels, then add bass traps and diffusion.
- Avoid relying on thin foam as the main solution; it does little for low mids.
- Repurpose panels as gobos to add flexibility during tracking.
- Track purchases by measurable gains: decay time and frequency smoothing.

“Acoustic treatment is the biggest bang-for-buck—fix the room, then tune your workflow.”
Learn from pros and classic home-recorded albums
Many landmark albums prove that a modest room can yield huge artistic returns. Billie Eilish’s debut, Springsteen’s Nebraska, and Bon Iver’s For Emma show how constraint shaped tone and creativity. Study those records to see how simple choices became signature sounds.
Case studies: practical tips from engineers and producers who work at home
What to copy, and what to adapt.
- Note how quick capture and comfort let people catch ideas before they fade; keep a ready rig to seize moments.
- Apply Storyk’s fundamentals—symmetry, first reflections, quiet AC, and corner bass control—at any budget.
- Borrow Grotto’s portable-rig mindset: a compact interface, one good mic, and a small rack travel between rooms and projects.
- Use Lysoivanov’s approach: aim cardioid nulls and choose dynamics when treatment is limited to control room coloration.
- Track how engineers iterate over years; note placement changes and panel moves that improved translation.
Treat every session as a lesson. Build a short playbook of what worked, what failed, and which setups helped people perform. Over time that documented experience becomes your most reliable production tool.
Your next steps: from first clap test to first finished track
Listen closely to a single clap—flutter and ring guide early treatment decisions. Do the clap test and mark reflection points. That one check points you to quick, high‑impact moves.
Pick your listening wall, set the triangle, and avoid the exact room center. Then treat first reflections and recheck with a familiar reference track to hear real gains.
Add corner bass traps next and re-measure. Build a lean recording chain, take the first passes, and use EQ, gates, and spectral repair where needed to keep momentum.
Create a repeatable process: session templates, labeled tracks, and saved measurements. Set a realistic timeline from first setup to first finished track so projects keep moving.
Keep a short list of ideas for the next cycle and celebrate practical wins—better translation, faster mixes, and happier collaborators are the clearest signs your way forward works.
Leave a Reply